Monday, December 24, 2012

Christmas Cookies and Candies

Tis the season for gluttonous treats and decadent deliciousness! Even though I've been running a million miles an hour as I prepare for Christmas and 6 months of travel, I often found myself in the kitchen whipping up some of my favorite Christmas goodies. Here's a small sampling of the treats I've been busy creating! =)

Peppermint dipped pretzels
 Almond toffee

 Sugar cookies!


Pizelle cookies

Russian Tea Cakes

Merry Christmas and Happy Holidays, everyone!

Saturday, November 24, 2012

Dipped Peppermint Cookies - Oh Mylanta!

So, I got bored. And boredom in Amy's world leads to baking/making completely unhealthy goodies in the kitchen. Now that we've celebrated Thanksgiving, it's officially time to bust out all things Christmas and holiday related! So what did I concoct? Little bites of heaven made from peppermint sandwich cookies, white candy coating, and a sprinkle of peppermint! YUM! Anyone who knows Trader Joe's and their sinful little treats, Peppermint Joe-Joes, knows that once you nibble on one of these bad boys, you will never be able to stop! You've been warned.

Ingredients:
1 package Peppermint cream sandwich cookies (technically Oreo cookies, but any similar style works just fine!)
1 package white candy coating
Peppermint crunch sprinkle topping (optional)

Materials:
Wax paper
Large fork

Directions:
1. Melt candy coating in a large bowl (think Pyrex) according to package directions. Stir often and heat at half power to ensure you don't burn the coating!
2. Drop cookies into chocolate one at a time. Turn and coat
3. With large fork, pull cookie out and gently shake excess off into the bowl. Place on wax paper.
4. Sprinkle peppermint chips on top for garnish.
5. Let sit until hard. Enjoy! (for an added treat, try popping a few in the freezer! They taste deliciously refreshing when enjoyed straight out of the freezer!)


Easy peasy, right? And they're SO YUMMY!


Thursday, November 8, 2012

Creating Mindy's Color-Me-Rad Cake!

A little while back, I made this cake for my sister-in-law's 30th birthday! I got to throw powdered sugar (that I dyed) onto the cake to create the same splattered effect as the Color-Me-Rad run! Here's how I did it! Enjoy! {sorry the video is so small!}


Arizona Going-Away Party Cake

A friend of a friend of my sister-in-law (how's that for relation? haha) contacted me in the hopes of getting a large cake for her going-away party as she and her family prepare to move to Arizona. She didn't have any major specifications other than she wanted a square cake large enough to feed 70 and she really loved the idea of a 4-layer cake with different colored cake for each layer. Oh, and she had a unique request for the written sentiment, but more on that later. The rest of the cake design was up to me!

Having never done a going-away cake before, I played up the idea of Arizona and instantly thought of an Arizona desert sunset. Since she wanted different colored cake on the inside, I thought I'd do a gradation of sunset colors you would see in the desert sky. I had fun and am very happy with how things turned out!


 Melissa's giggle-worthy request was to have "Later Bitches" written on the top of the cake. Hey, she's payin' for it! I'll do whatever! So, I stretched my creativity and replaced the t's with cacti! =)
I wasn't there when the cake was cut, but Melissa sent me pictures of the inside of the cake. I was happy to see the finished product!


Tuesday, October 23, 2012

Hello Kitty Baby Shower

I got to make a FUN baby shower cake two weekends ago! I'll admit, when I first heard the theme, I about fell out of my chair! It seemed CRAZY for a baby shower, but once I put the cake together, delivered it, and saw how adorable the whole theme was, I thought it was pretty darn cute!

Behold! The Hello-Kitty-Hot-Pink-Zebra-Striped Baby Shower Cake!


 The inside of the cakes even matched the theme! I had so much fun creating these fun patterns!


Sunday, September 30, 2012

Color Me Rad Cake: Happy Dirty 30!

My wonderful sister-in-law just celebrated her 30th birthday! To celebrate, we all decided to run (ok...walk) the "Color Me Rad" 5K run. The weather was perfect, and we had fun getting wild and wacky in the race that throws colors at you while you pass by! After we ended the morning a bit more colorful than we started, we began preparations for a surprise party for Mindy at our house. Being the baker/cake decorator of the family, I wanted to do something fun and colorful to match the theme of our day! So, I decided to decorate the cake JUST like the volunteers decorated us runners (ok, ok...walkers!) What did I do? I threw powdered sugar at the cake! AND IT WAS AWESOME!

 Happy "Dirty 30" Mindy!


I dyed powdered sugar by hand (boy was that a labor of love), let it dry, and then sifted it to remove an extra lumps. I iced the cake in a plain white buttercream, took the whole deal outside, and the lobbed handfuls of colorful sugar on to the cake! IT WAS FUN! I'll be posting a video of my endeavors soon!

The cake was already busy on its own, so I didn't want to add even more by writing on the cake. AND, in keeping with the race theme, I thought it would be fun to make a banner with the written sentiments on it rather than writing in icing! (Like a finish line...get it?) So, I set to work making a little colorful banner. It was easy! Here's how!

Step 1: Cut the number of triangles you need (in the colors you desire) using one triangle as the template for all the others.
   
Step 2: Gather an appropriate surface (I used a bulletin board) to push a push pin in to the top two corners of each triangle. 
 Step 3: Gather string and needle to string the triangles on in the order you desire.
Step 4: Add written sentiment!
 Step 5: Attach ends to bamboo skewers or anything similar, leaving a little room so the banner hangs! 
Step 6: Insert in to cake!

With an outside looking wildly colorful, I knew I couldn't make the inside boring and blah! So, what did I do? I spruced it up a little!


 Ok...maybe a LOT!

WHOO! I don't think I've ever seen such a colorful cake!
And it's easy to make such a colorful, tye-dye creation!

Step 1: Make yellow cake according to normal directions.
Step 2: Divide batter evenly in to as many different bowls as you desire colors.
Step 3: Color each bowl with the color of your choice.
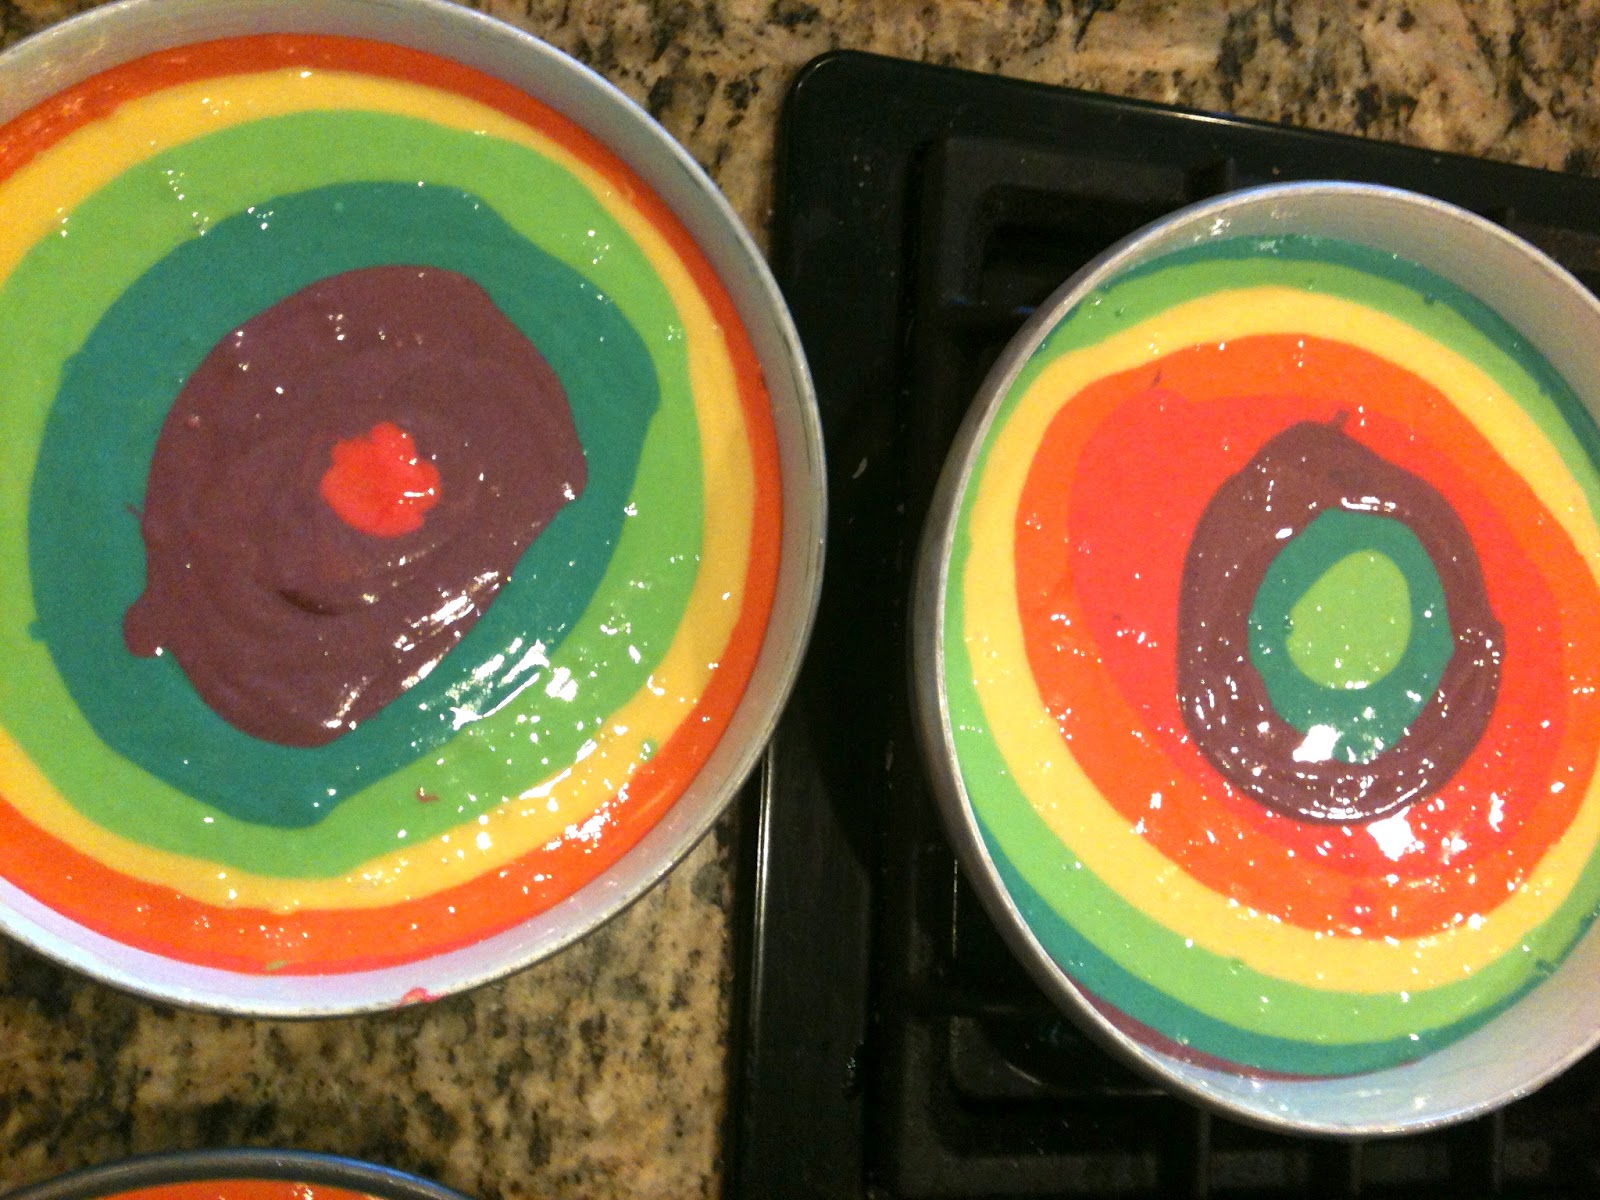
Step 4: Layer batter color by color. Pour your first color into the middle of a 9" round pan. Tap pan on the counter a little to spread the batter out. Repeat over and over with various colors until you have rings of color...like this!
 Step 5: Bake according to normal directions! You'll end up with a lovely, colorful cake!


I don't think I've ever had so much fun making a cake! How often does a baker get to throw powdered sugar at a cake? haha

Tuesday, August 21, 2012

Musical Cookies for Musical Little Ones!

I've had so much fun this summer teaching multiple Music Together classes with Petite Musician. We just finished our last week of classes for the semester and I wanted to give my little ones a fun treat to wrap up the unit! What better than making them some musical cookies to enjoy? I had a blast making these, and by the looks of it, the kids have had a blast eating them! (Frosting faces have erupted mere bites into the treats!)


Thursday, August 2, 2012

Cookies for a Softball All-Star!

My cousin (really, my cousin's daughter...I forget what relation that is. 1st cousin once removed?) just graduated from High School and finished an ALL STAR athletic career. Sammie played pretty much every sport available, but killed it when it came to Softball. She was accepted to the All-Star team, so we decided she should celebrate with some cookies! My parents and aunt are on their way to Iowa right now to have a visit with family, so I sent the cookies with them to give to Sammie.

I had fun playing around with different designs. Her team colors were purple and yellow.